Written by Jazmine Miles Long, Taxidermist. https://www.jazminemileslong.com, Twitter: @TaxidermyLondon; Instagram: @Jazmine_miles_long
In my opinion there isn’t one system to do things correctly in taxidermy, every museum or taxidermist may have their own preferences and strategies already in place. This is simply a guideline that works for me, and I hope it can help others to mitigate some of the problems I encounter when working with skins that have been frozen in a way that has accelerated freezer burn. Following this advice might get more time out of frozen specimens and give you a greater chance that they can be mounted once the budget or staff time is there to pay for taxidermy or processing cabinet skins.
What is freezer burn?
Freezer burn happens when the moisture is evaporated out of the animal’s skin and muscles over time in the freezer. Most specimens even if they are well packed in the freezer will still get some freezer burn over a long period of time but it will be much worse if the specimen is poorly packaged or has something absorbent (like a paper label) inside the bag with it.
You can tell if a specimen has freezer burn because it will look white and dry in areas such as the feet, hands, around the eyes, ears, and mouth. And when you start skinning the skin will be yellowed and hard to remove rather than red, fleshy, and easy to peel away.
Firstly, I advise to always freeze your specimens before handling or skinning them. At a minimum you could record the specimen’s weight before freezing as this measurement is affected slightly after freezing. I personally would not take any other measurements until after they have been thoroughly frozen (unless you want to collect live parasites). As the animal dies, any parasites on the skin of the animal will leave the body as it cools and hop onto the next willing subject which will be you or any living creature in your lab! A note that fleas are not killed over night, if you freeze a fox for example leave it in there for at least two weeks before defrosting. It completely depends on the temperature of your freezer however so if you start to defrost an animal the fleas will defrost first, so if there is movement you know to refreeze! Obviously very large animals may need to be skinned straight away, so in this case my advice is wear appropriate PPE.
How to Package
Tuck in wings and limbs as much as you can to save space. Fold in long, pointed or sharp beaks, sharp teeth, claws, and talons if you can as these can pierce bags.
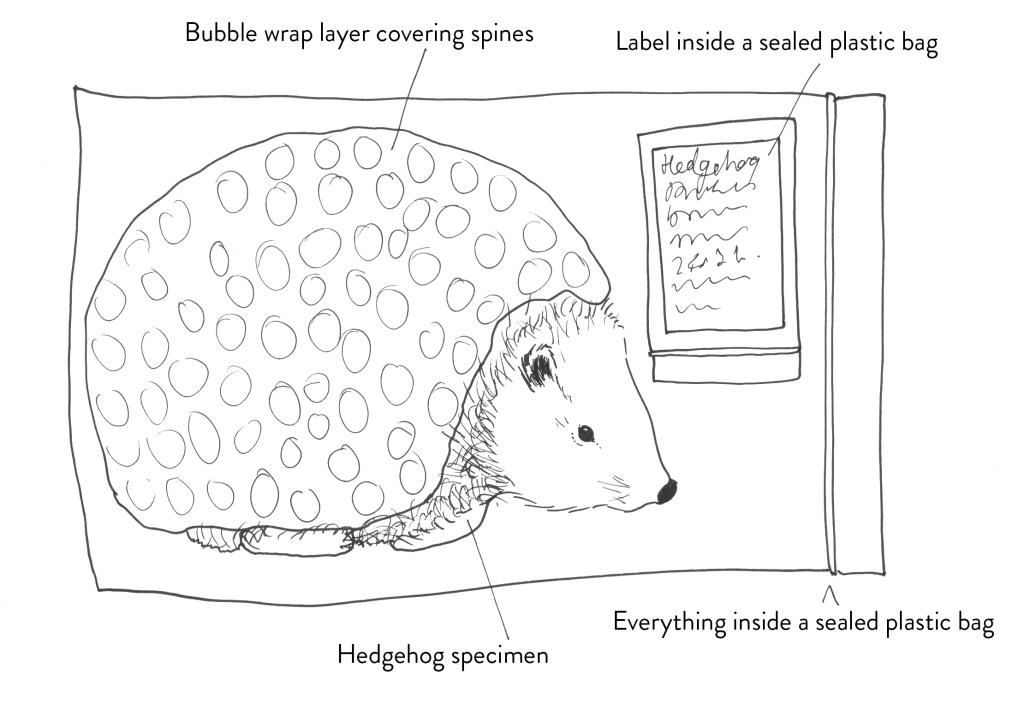
You can also wrap any sharp parts (such as hedgehog spines) that cannot be tucked away with a non-absorbent padding such as bubble wrap to stop these piecing through the bag or someone’s hand when they are searching through the freezer.
You can gently curve long tail feathers of birds but do not put too much pressure on them because bending or snapping the quill is not good.
Always bag them up, never put specimens into the freezer un-bagged. This can lead to labels getting lost and specimens getting damaged / sticking to each other!
Place in sealed plastic bags. Plastic grip seal bags work well, and some museums may already have a heat-sealing bag system for conservation. Clear bags are better because you can see the specimen inside. When you are bagging up the specimen, if air can get out then moisture can too. When sealing bags squeeze as much air out as possible to save space in the freezer.
Do not use black dustbin bags as they degrade! Cling film is a popular choice because it holds in all the important feathers, but it is not airtight and it also degrades over time and becomes brittle. If the animal is large, then bin bags may be your only option unless you have access to large, sealed bags. If you do use a bin bag, use a good quality thick one, wrap it round your specimen and seal the bag either by tying a knot or using tape. Then do this again so the specimen is double bagged. If the specimen is going to be in the freezer for a short time, then a sealed large plastic box might be a better option, but it depends on freezer space.
If you have a few specimens from the same batch that you want to keep together then individually bag up each specimen and then put all of these into another bag. If you put specimens in the same bag, they can stick to each other and feathers, fur and skin can get damaged.
Labels
Do not put the label in the same bag as the specimen! For a few reasons –
- If non-waterproof ink has been used this it can stain feathers or fur.
- The label might stick to the specimen or get wet and may become illegible.
- The paper of the label will suck moisture out of the skin and cause accelerated freezer burn.
Put the label in a small, sealed bag, place this inside the bag with the specimen. You can always punch a hole above the seal off the bag and use this to tie it to the specimen. Put another clear label on the outside of the bag, I staple these to the bag but on the seam where it will not cause a puncture into the bag. But be aware it is important to have a label inside the bag because the one on the outside could fall off…
If a snake is venomous clearly label this throughout! And I recommend also placing these inside a plastic sealed box within the freezer clearly labelled to avoid accidents.
If your freezer has a mixture of small and large specimens place the large ones in the bottom and the smaller ones at the top. You can also organize this by stacking animal sizes into sealed plastic boxes into the freezer and attach a log sheet on the top of each box so you can easily see what is inside.
If you have very delicate specimens, you can bag them up and then use bubble wrap to create safe little beds to cradle them in inside their own sealed plastic boxes.

How long can a specimen be in the freezer?
There are varied opinions on this. One is that the sooner you work on a skin the better the mount will be. And yes, it is true because it will be easier to skin a specimen that is fresh. But that does not mean it is impossible or that the mount will not be good. This in my opinion relies on experience. Most of the specimens I work with are quite old, so I have had to battle freezer burn as a day to day, and yes, I have had the occasional skin that has been un-mountable.
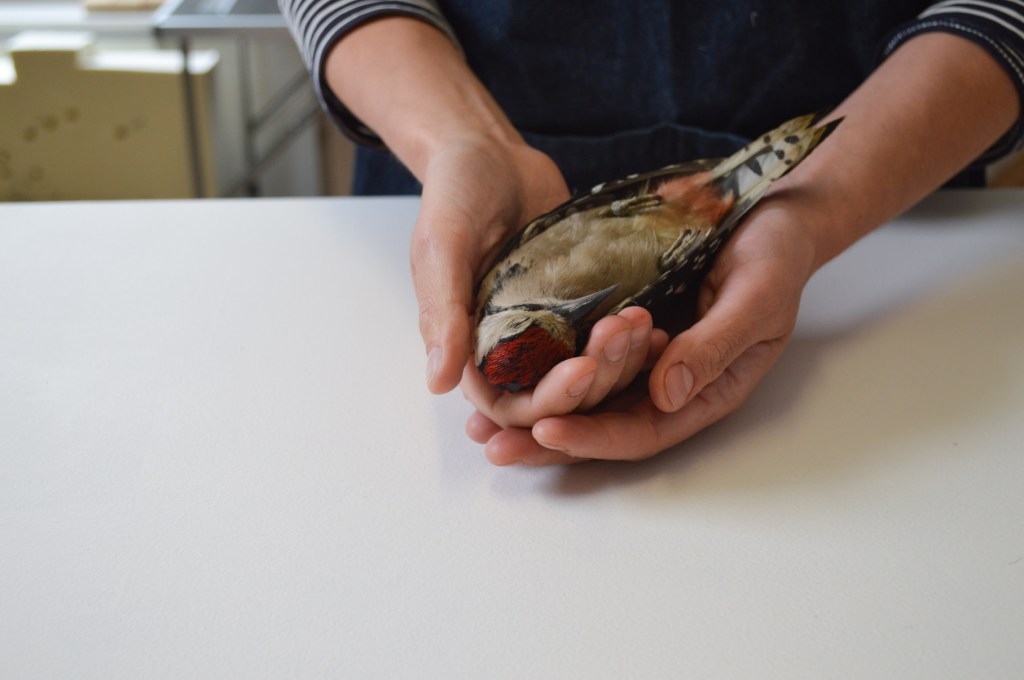
Here is an example of a tree creeper I mounted in 2015 it had been frozen in Sheffield Park Museum’s freezer for 40 years (the label was in the bag but not touching the bird). It was not pleasant to skin, and it was extremely hard to distinguish skin from flesh, but it was possible. Unfortunately, there was also a kingfisher and a blackcap frozen for the same amount of time but these I could not save, I remember the kingfisher was thoroughly stuck to its label and kingfishers are prone to slipping* even before any freezer burn occurs. But I would say I regularly mount specimens that have been in my own freezers for way over 10 years and so I have had more control over the use of labels and packaging, and these have been fine. When I am working on a specimen and I can see there is evidence of freezer burn I rehydrate the skin by injecting water with a small amount of alcohol in areas around the skin, I then refreeze, and the freezing process stretches the skin open so I can easily skin the specimen.
When sending frozen specimens to a taxidermist make sure you have seen the quality of their work or have had a good recommendation. Ask the taxidermist if they have worked on old frozen specimens before and have knowledge of tackling freezer burn.
I will point out here that a specimen will not be able to be mounted into taxidermy if it has begun to decompose. Sometimes specimens go into the freezer which are already not good enough for taxidermy and freezers can malfunction or may lose power without this being noticed. When this happens and specimens are defrosted for too long, there is nothing any taxidermist can do apart from a skeleton preparation.
If you want to add your advice to this blog post, please comment below so we can all share our techniques.
*Slipping is where decomposition has started to set in, and the fur or feather layers of the skin simply slips away.
NOTE: This article has also been translated into German and is free to download.


Hi Jazmine, thanks for the great article! One thing that I’ll add, that the ornithology curator at my local museum shared with me, is that you can greatly decrease the incidence of freezer burn if you keep your specimens in a secondary insulated container. (eg having coolers with specimens in them, inside the walk-in freezer). He tested this using frozen chicken wings and weighing them, and found that the ones in the coolers lost less water.
I think the rationale is that they are much more temperature-stable; they’re less likely to warm up enough to juuuuust melt the outside layer and have water evaporate off. It also prevents the ice crystals from forming and then attracting water molecules that have sublimated from the frozen specimen (which is how freeze-dryers work).
Obviously this is an extra step that not everyone would have room for, and is secondary to properly sealing your specimens!
LikeLike
Thank you Dana. Having everything in a secondary insulated container makes a lot of sense if there is the space to do so, it would also mean specimens could be grouped together making it easier to find what you are looking for when rifling through the freezer. Thank you for sharing! Jazmine.
LikeLike
Thanks for this great article!
LikeLike
Pingback: NatSCA Digital Digest – July 2022 | NatSCA
Pingback: NatSCA Digital Digest – August 2022 | NatSCA
Pingback: Top NatSCA Blogs of 2022 | NatSCA